from 1350 RUB/month

WhatsApp integration for Bitrix24

Start chats first and communicate from Bitrix24 via WhatsApp without limits

Try for free

5-day trial period

Интеграция WhatsApp для Битрикс24Интеграция WhatsApp для Битрикс24

WhatsApp in Bitrix24

Simple integration

A fast and simple WhatsApp integration with Bitrix24. Chat with clients directly from CRM using a popular messenger. Connect in just 5 minutes without developers or complex setup.

Sign up in Wappi and get a 5-day free trial to explore the service!

Wappi in Bitrix24 supports messengers

Integration features

Start chats first in WhatsApp

Unlimited chats. Message by phone number from contact, lead, deal card, or widget.

Пишите первыми в WhatsApp

Open Channels support

Chat in WhatsApp via the built-in Bitrix24 messenger.

Переписывайтесь в WhatsApp через встроенный мессенджер Битрикс 24

Bulk messaging

Create WhatsApp broadcasts with the CRM Marketing tool.

Send and receive media

Receive and send images, documents, files, audio, video, and voice messages.

Robots and business processes

Use all Bitrix automation capabilities with Wappi robots and build your own templates.

Privacy settings

Choose which Bitrix24 users can send messages via the widget.

Group chat support

Chat in WhatsApp group chats directly from Open Channels.

Connect multiple numbers

Connect several WhatsApp profiles at once, for example one per manager.

Additional capabilities

  • Unlimited messages
  • All chats in one window
  • Automatic deal and lead creation
  • All chat history is stored in CRM
  • Delivery and read statuses
  • Blacklist
  • Missed call notifications

Integration setup

Connect WhatsApp to Bitrix in 5 minutes without complex setup

Step 1

Install the app

Install the Wappi app from Bitrix24 marketplace.

Install
Step 2

Sign up

Sign up at Wappi.pro and connect your WhatsApp number.

Registration
Step 3

Connect Wappi and Bitrix24

Add the required WhatsApp profile in the Wappi app inside Bitrix24.

Plans for Bitrix24

5-day free trial for each messenger

  • Whatsapp
  • Telegram
  • Telegram Bot
  • MAX
  • MAX Bot
  • Авито
  • ВКонтакте
  • Instagram
  • HH.ru

WhatsappFull

1690 ₽
1600 ₽1690 ₽
1500 ₽1690 ₽
1350 ₽1690 ₽

for 1 profile per month

A profile is one connected messenger account. You can change phone numbers within one profile.
  • Unlimited messages
  • Services:
    • Агрегатор мессенджеров
    • Чат-боты
    • Рассылка сообщений
    • ИИ-ассистент
    • Виджет на сайт
  • API:
    • Whatsapp API
  • Integrations with Bitrix24:
    • Можно писать первым
    • Групповые чаты
    • Роботы и умные сценарии
    • Массовые рассылки

Discounts for 10+ profiles

Start free

Earn with us

Join our partner program and get additional income:

  • Bring clients
  • Get up to 40% of their payments

Learn more here

Become a partner

Reviews

Frequently asked questions

What capabilities does the WhatsApp and Bitrix24 integration provide?

The integration lets you send and receive WhatsApp messages directly from Bitrix and manage contacts and CRM data. You also get access to all Wappi services: messenger aggregator, chatbots, AI assistant, message broadcasts, and website widget.

How long does it take to connect WhatsApp to Bitrix24?

You can connect WhatsApp to Bitrix24 in about 5 minutes. Sign up in Wappi and follow the prompts. If you need help, use the guides or contact our support team.

Can I connect multiple WhatsApp numbers?

Yes, with Wappi you can connect an unlimited number of WhatsApp numbers and configure integration with Bitrix24.

Did not find your answer?

If setup fails, use our guides or contact support

Telegram

WhatsApp setup guide for Bitrix24

Sign up in Wappi

Step 1

Click Registration, enter your email and password, then activate your account using the email message.

Step 2

Activate your account via the email message.

Step 3

Do not forget to use the free 5-day trial period.

Step 4

Now connect your WhatsApp number by following the service instructions.

Step 5

You will need PROFILE ID and API TOKEN to enter these values later in the Wappi app in Bitrix24.

Collapse

Install the app in Bitrix24

Step 1

Open the app page in Bitrix24 marketplace: WhatsApp Wappi.

Step 2

Click Install.

Step 3

In the popup window, check consent checkboxes and click Install again.

Collapse

Connect Wappi and Bitrix24

Step 1

Open your Wappi account dashboard.

Step 2

Choose the required WhatsApp profile and find its API Token and Profile ID.

Step 3

Open the Wappi app in Bitrix24.

Step 4

Enter API Token and Profile ID, then click Save.

Step 5

Done, your number is connected!

Collapse

Core capabilities

How WhatsApp works in Bitrix24 via Wappi

How to create a WhatsApp bulk campaign in Bitrix24

Step 1

You can create a WhatsApp bulk campaign via the Marketing tool.

Step 2

Choose SMS campaign.

Step 3

Choose the required prebuilt campaign template.

Step 4

Choose recipients by selecting an existing segment or creating a new one.

Step 5

Make sure the campaign is sent via WhatsApp Wappi service. If another service is selected, switch to WhatsApp Wappi.

Step 6

Enter campaign text. You can use variables like #NAME#.

Step 7

Configure required campaign settings and click Save. The campaign is ready.

Step 8

You can start, stop, and edit campaigns from the Campaigns tab. To start a campaign, click Send.

Collapse

Robots

How to create a robot in Bitrix24 to send a WhatsApp message

How to create a robot that sends a file from a deal in Bitrix24

Step 1

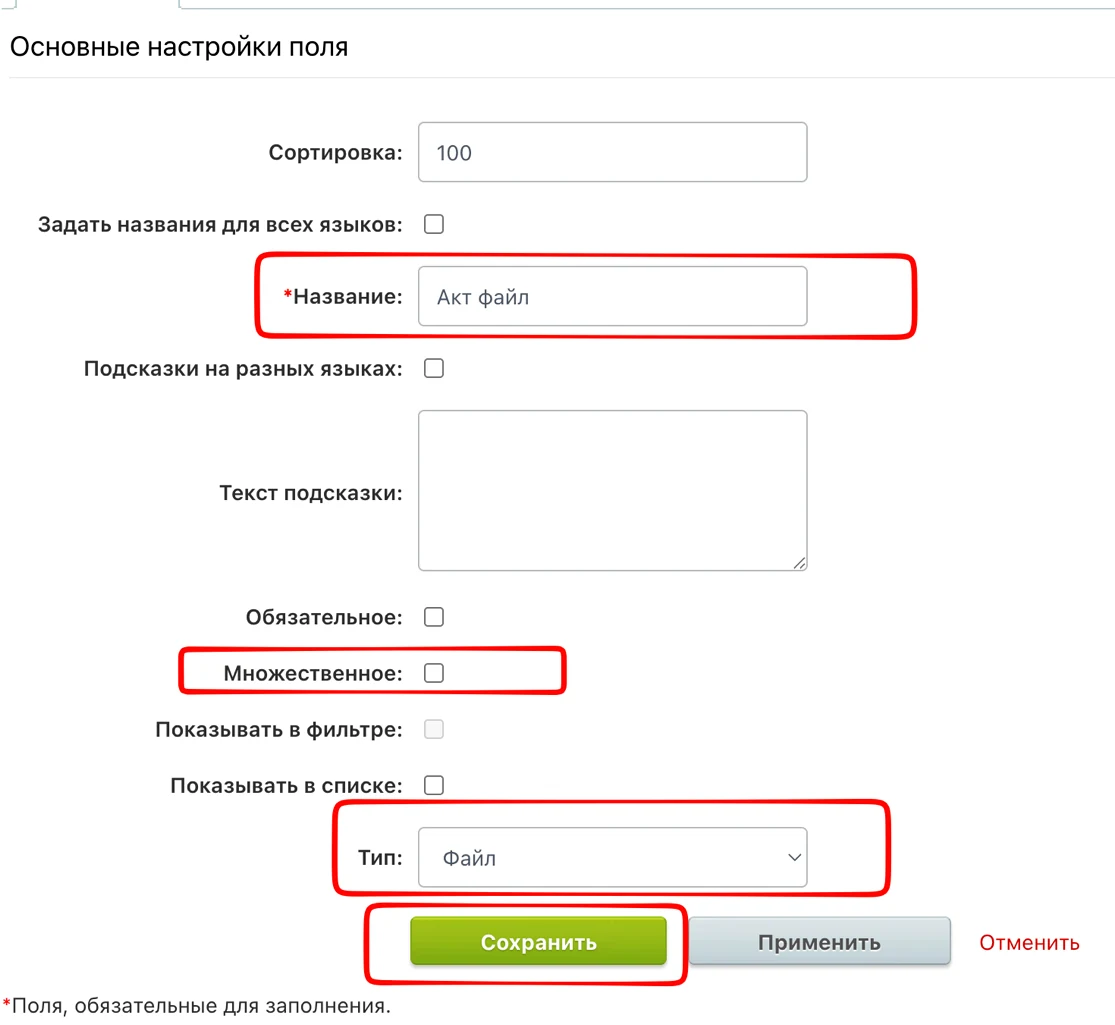
Before creating the robot, make sure the deal has a custom field of type “File”. If it does not:

- Open “CRM settings”, then “Form and report settings”, then “Custom fields”.

- In the “Deal” section, click “Add field”.

- Enter the field name and type. Make sure “Multiple” is disabled.

- Click “Save”.

Step 2

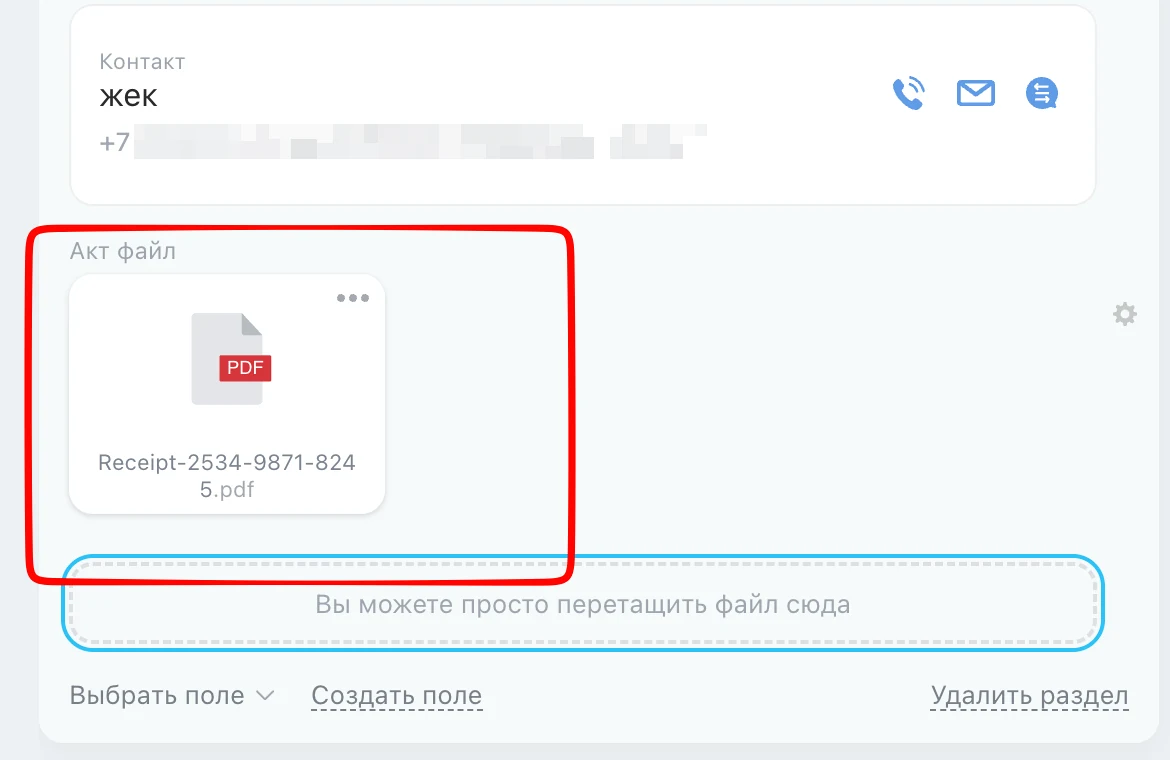
Open the required deal and attach the file to the custom field.

Step 3

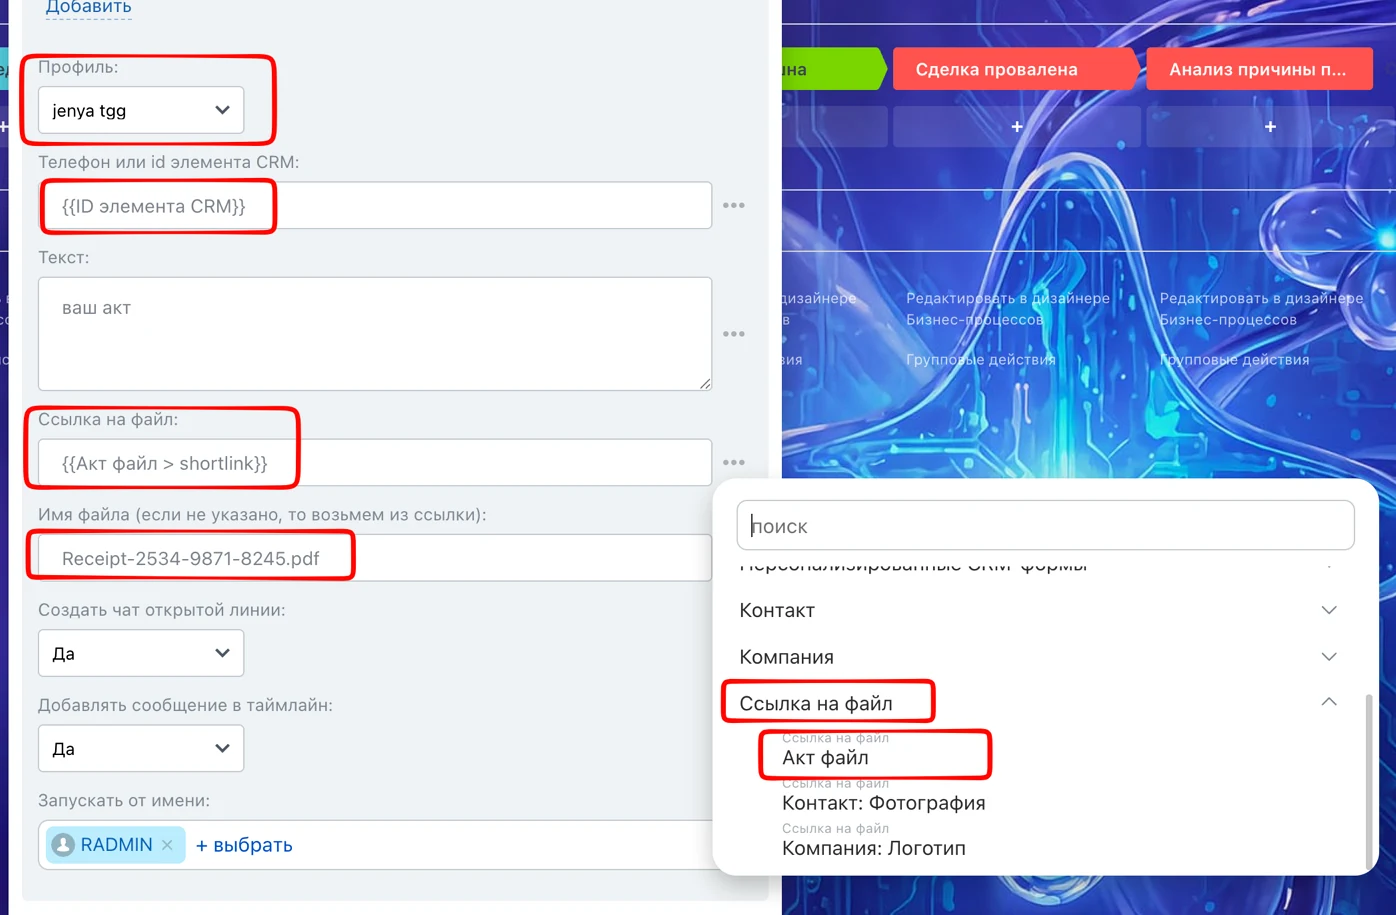
To add a robot, open “Deals” and go to “Robots”. Click “Create”, or select the deal stage that should trigger the robot and click “+ Add”. Select the appropriate Wappi robot for sending a message.

Step 4

In “Profile”, select the Wappi profile you want to send the message from. In “CRM element ID”, select the deal’s “CRM element ID”. Enter the message text, then click “File link” in the file field and select the required custom field. Configure other settings as needed and save the robot.

Collapse

Check if a WhatsApp number exists. Cascade campaign

Robot: Send message to WhatsApp

Step 1

The robot sends a WhatsApp message to a client. In Deals, open Robots, click Create (or choose a deal stage), then add via + Add. Select Other robots -> [Wappi] Send message to WhatsApp.

Step 2

In Profile, select a Wappi WhatsApp profile to send from. In CRM element ID, select the deal/contact/lead CRM element ID with the attached chat. Enter text, optionally attach a file (direct file URL), configure other settings, and click Save.

Collapse

Robot: Check whether number exists in WhatsApp

Step 1

The robot checks whether the client has WhatsApp. Results for automation: Y if number exists, N if not, plus operation timeout. Add it in Deals -> Robots -> Create (or stage) -> + Add -> Other robots -> [Wappi] Check whether number exists in WhatsApp.

Step 2

In Profile, select a Wappi WhatsApp profile for verification. Then select the contact CRM element ID whose number you want to check. Click Save.

Step 3

After execution, robot returns Y if WhatsApp exists for the number, or N if it does not. You can use this result in notifications or follow-up messages by setting the next robot to run after the previous one.

Step 4

Using these robots is optional for standard campaigns and mainly useful for messenger number verification in business processes. Frequent checks are unsafe: WhatsApp may treat this as suspicious activity and block your number.

Collapse

Robot: Add message to WhatsApp queue

Step 1

The robot sets an interval between outgoing messages to reduce risk of blocks/bans for too many messages sent at once. Useful when multiple deals move to one stage simultaneously. Add via Deals -> Robots -> Create (or stage) -> + Add -> Other robots -> [Wappi] Add message to WhatsApp queue.

Step 2

In Profile, select Wappi WhatsApp profile to send from. In CRM element ID, select deal/contact/lead CRM element ID with attached chat. In Timer, set interval in seconds. Enter message text, optionally attach file, configure other settings, and click Save.

Collapse

Robot: Get chat information

Step 1

The robot returns chat details from Wappi line: chat/company/contact/deal/dialog/lead/line/Wappi chat IDs; error description if failed; chat name; Y if chat exists for this profile, N if not; operation timeout. Add via Deals -> Robots -> Create (or stage) -> + Add -> Other robots -> [Wappi] Get chat information.

Step 2

In Profile, select the Wappi profile whose line contains the target chat. Select deal/contact/lead CRM element ID with attached chat. Click Save.

Step 3

All available chat data for further automation is returned in robot results.

Step 4

Important: the next robot must be configured strictly as After previous robot.

Collapse

Robot: Get chat information by symbolic code

Step 1

The robot returns chat information by open line user string identifier from Messenger field: chat/company/contact/deal/dialog/lead/line/Wappi chat IDs; error description if failed; chat name; Y if chat exists, N if not; timeout. Add via Deals -> Robots -> Create (or stage) -> + Add -> Other robots -> [Wappi] Get chat information by symbolic code.

Step 2

In Symbolic chat code, paste open line user string ID from the Messenger field in the contact card. Then click Save.

Step 3

All available chat data for further automation is returned in robot results.

Step 4

Important: the next robot must be configured strictly as After previous robot.

Collapse

Robot: Add user to chat

Step 1

The robot adds users to a chat. Add via Deals -> Robots -> Create (or stage) -> + Add -> Other robots -> [Wappi] Add user to chat.

Step 2

In Profile, select Wappi profile whose line has the target chat. In CRM element ID, select deal/contact/lead CRM element ID with attached chat. Select Bitrix24 user to add to the chat, configure other settings, and click Save.

Collapse

Robot: Dialog actions

Step 1

The robot automates actions in Open Line dialogs: close another user dialog, reply to dialog, close own dialog, take over dialog, join dialog, start dialog. Add via Deals -> Robots -> Create (or stage) -> + Add -> Other robots -> [Wappi] Dialog actions.

Step 2

Choose action. In Profile, select Wappi profile whose line has the target chat. In CRM element ID, set the linked element. Click Save. Actions: Close another user dialog, Reply to dialog, Close own dialog, Take over dialog, Join dialog, Start dialog.

Collapse

Robot: Wait for client message

Step 1

The robot waits for client response. Additional robot results include: error description if user could not be added, message type (text/file/image etc.), file link, message ID, message text, and timeout. Add via Robots -> Create (or stage) -> + Add -> Other robots -> [Wappi] Wait for client message.

Step 2

In Profile, select Wappi profile whose line contains the chat. Select deal/contact/lead CRM element ID with attached chat, configure other settings, and click Save.

Step 3

You can use the client response to automate further processes and configure system actions based on the response option.

Step 4

If you use business process editor, set response wait time in robot settings. Important: next robot must be configured strictly as After previous robot.

Collapse

Smart scenarios

How to send a template WhatsApp message (Smart scenarios)

Step 1

Open CRM -> Deals -> Smart scenarios -> Create scenario.

Step 2

In the window, enter scenario name and description so employees can easily pick the right one later.

Step 3

In Robots section, choose required robots and build your action chain. Example: Robots -> + -> Other robots -> [Wappi] Send message to WhatsApp.

Step 4

Configure the robot. Select Wappi profile to send from, set recipient CRM element ID (deal/contact/lead/company) so data is pulled from card automatically, enter text, configure other settings, then click Save.

Step 5

For flexible launch configuration, you can use: Configure by admin before launch (params set by admin in Scenario settings), Ask at launch (input dialog appears on start), Select now (preset fixed params before use).

Step 6

If you selected Configure by admin or Ask at launch earlier, define required parameters in Scenario settings and click Save. Scenario is configured and ready.

Step 7

To run a smart scenario, select required items, then choose the scenario in Scenario list -> Smart scenarios -> Message sending. After launch, all configured actions run automatically.

Step 8

If additional launch parameters were configured, a dialog appears before execution. In this example, you need to enter the outgoing message text.

Collapse

How to send a campaign to selected deals in WhatsApp (Smart scenarios)

Try Wappi for free

Trial period - 5 days for any plan